On this page
- Prerequisites
- Create a GitLab Personal Access Token
- Webhook Configuration using the CLI
- Webhook Configuration (Manual)
- Create the Secret
- Create the Repository CR
- Notes
- Working with Forked Repositories
- Token Scoping for Fork-based Workflows
- Status Reporting Fallback
- Troubleshooting Fork Merge Requests
- Why does my fork merge request show comments instead of status checks?
- How can I get status checks instead of comments?
- Option 1: Bot Account (Recommended for Production)
- Option 2: Group-scoped Token
- Option 3: Accept Comment-based Status (Default)
- Can I disable status comments entirely?
- Can I use forks for development within a single repository?
- Where can I learn more about the fallback mechanism?
- Add Webhook Secret
- Update Token
- Update using the CLI
- Update using kubectl
GitLab
This page covers how to configure Pipelines-as-Code with GitLab through a webhook. Use this method to run Tekton pipelines triggered by merge requests and push events on GitLab repositories, including self-managed GitLab instances.
Prerequisites
- A running Pipelines-as-Code installation
- A GitLab personal access token with
apiscope (see below) - The public URL of your Pipelines-as-Code controller route or ingress endpoint
Create a GitLab Personal Access Token
Follow this guide to generate a personal token as the manager of the organization or the project:
https://docs.gitlab.com/ee/user/profile/personal_access_tokens.html
api access to the forked repository from where
the MR originates, a project-scoped token will fail for fork-based workflows. Pipelines-as-Code falls back to showing the pipeline status as a comment
on the Merge Request.Store the generated token in a safe place, or you will have to recreate it.
Webhook Configuration using the CLI
Use the tkn pac create repo command to
configure a webhook and create the Repository CR in one step.
You need a personal access token created with the api scope. tkn pac uses this token to configure the webhook and stores it in a secret in the cluster, which the Pipelines-as-Code controller uses for accessing the repository.
Below is the sample format for tkn pac create repo:
$ tkn pac create repo

? Enter the Git repository url (default: https://gitlab.com/repositories/project):
? Please enter the namespace where the pipeline should run (default: project-pipelines):
! Namespace project-pipelines is not found
? Would you like me to create the namespace project-pipelines? Yes
✓ Repository repositories-project has been created in project-pipelines namespace
✓ Setting up GitLab Webhook for Repository https://gitlab.com/repositories/project
? Please enter the project ID for the repository you want to be configured,
  project ID refers to an unique ID (e.g. 34405323) shown at the top of your GitLab project : 17103
👀 I have detected a controller url: https://pipelines-as-code-controller-openshift-pipelines.apps.awscl2.aws.ospqa.com
? Do you want me to use it? Yes
? Please enter the secret to configure the webhook for payload validation (default: lFjHIEcaGFlF):  lFjHIEcaGFlF
ℹ️ You now need to create a GitLab personal access token with `api` scope
ℹ️ Go to this URL to generate one https://gitlab.com/-/profile/personal_access_tokens, see https://is.gd/rOEo9B for documentation
? Please enter the GitLab access token:  **************************
? Please enter your GitLab API URL:  https://gitlab.com
✓ Webhook has been created on your repository
🔑 Webhook Secret repositories-project has been created in the project-pipelines namespace.
🔑 Repository CR repositories-project has been updated with webhook secret in the project-pipelines namespace
ℹ Directory .tekton has been created.
✓ A basic template has been created in /home/Go/src/gitlab.com/repositories/project/.tekton/pipelinerun.yaml, feel free to customize it.
ℹ You can test your pipeline by pushing the generated template to your git repository
Webhook Configuration (Manual)
If you prefer to configure the webhook yourself, follow these steps.
From your GitLab project, go to Settings –> Webhooks.
Set the URL to the Pipelines-as-Code controller public URL. On OpenShift, get the public URL of the Pipelines-as-Code controller like this:
echo https://$(oc get route -n pipelines-as-code pipelines-as-code-controller -o jsonpath='{.spec.host}')Add a secret or generate a random one with this command:
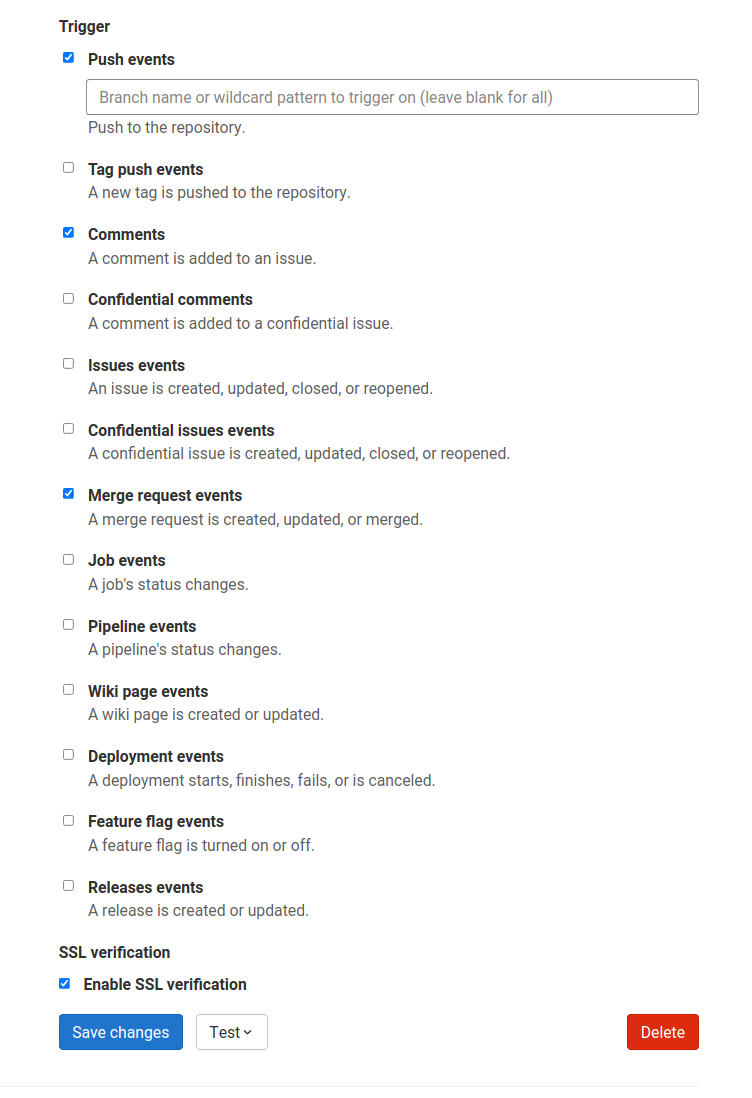
head -c 30 /dev/random | base64Refer to this screenshot on how to configure the Webhook.
The individual events to select are:
- Merge request Events
- Push Events
- Comments
- Tag push events
Click on Add webhook
Create the Secret
Create a Kubernetes secret containing your personal token and the webhook secret in the target-namespace (the namespace where your pipeline CI runs):
kubectl -n target-namespace create secret generic gitlab-webhook-config \
  --from-literal provider.token="TOKEN_AS_GENERATED_PREVIOUSLY" \
  --from-literal webhook.secret="SECRET_AS_SET_IN_WEBHOOK_CONFIGURATION"
Create the Repository CR
Create a Repository CR with the secret field referencing it:
---
apiVersion: "pipelinesascode.tekton.dev/v1alpha1"
kind: Repository
metadata:
  name: my-repo
  namespace: target-namespace
spec:
  url: "https://gitlab.com/group/project"
  git_provider:
    # url: "https://gitlab.example.com/ # Set this if you are using a private GitLab instance
    type: "gitlab"
    secret:
      name: "gitlab-webhook-config"
      # Set this if you have a different key in your secret
      # key: "provider.token"
    webhook_secret:
      name: "gitlab-webhook-config"
      # Set this if you have a different key in your secret
      # key: "webhook.secret"
Notes
Pipelines-as-Code does not automatically detect private GitLab instances, so you must specify the API URL under
spec.git_provider.url.The
git_provider.secretkey cannot reference a secret in another namespace. Pipelines-as-Code always assumes that it is in the same namespace where the Repository CR has been created.
Working with Forked Repositories
When your token scope affects how Pipelines-as-Code can report pipeline status on merge requests from forks, the following considerations apply.
Token Scoping for Fork-based Workflows
Project-scoped tokens: Limited to the upstream repository, cannot access forks. Status reporting falls back to merge request comments. This is the most secure option but has limited functionality.
Organization/Group-scoped tokens: Can access multiple repositories including forks. Enables status checks on both the fork and upstream. Requires broader permissions.
Bot account tokens: Recommended for production (see troubleshooting section below). Provides minimal required permissions and a clear audit trail.
Status Reporting Fallback
Pipelines-as-Code supports merge requests from forked repositories with an automatic fallback mechanism for status reporting:
Primary: Pipelines-as-Code attempts to set commit status on the fork (source project). If successful, the status appears in both the fork and upstream UI. This requires a token with write access to the fork repository.
Fallback: Pipelines-as-Code attempts to set commit status on the upstream (target project). The status appears in the upstream repository UI. This may fail if the upstream has no active CI pipeline for the commit.
Final Fallback: Pipelines-as-Code posts the status as a merge request comment. This always works as long as the token has merge request write permissions. The comment provides the same information as status checks in a different format.
This design ensures status reporting works even with restricted token permissions.
Visual Example:
Status checks appear in GitLab’s “Pipelines” tab:
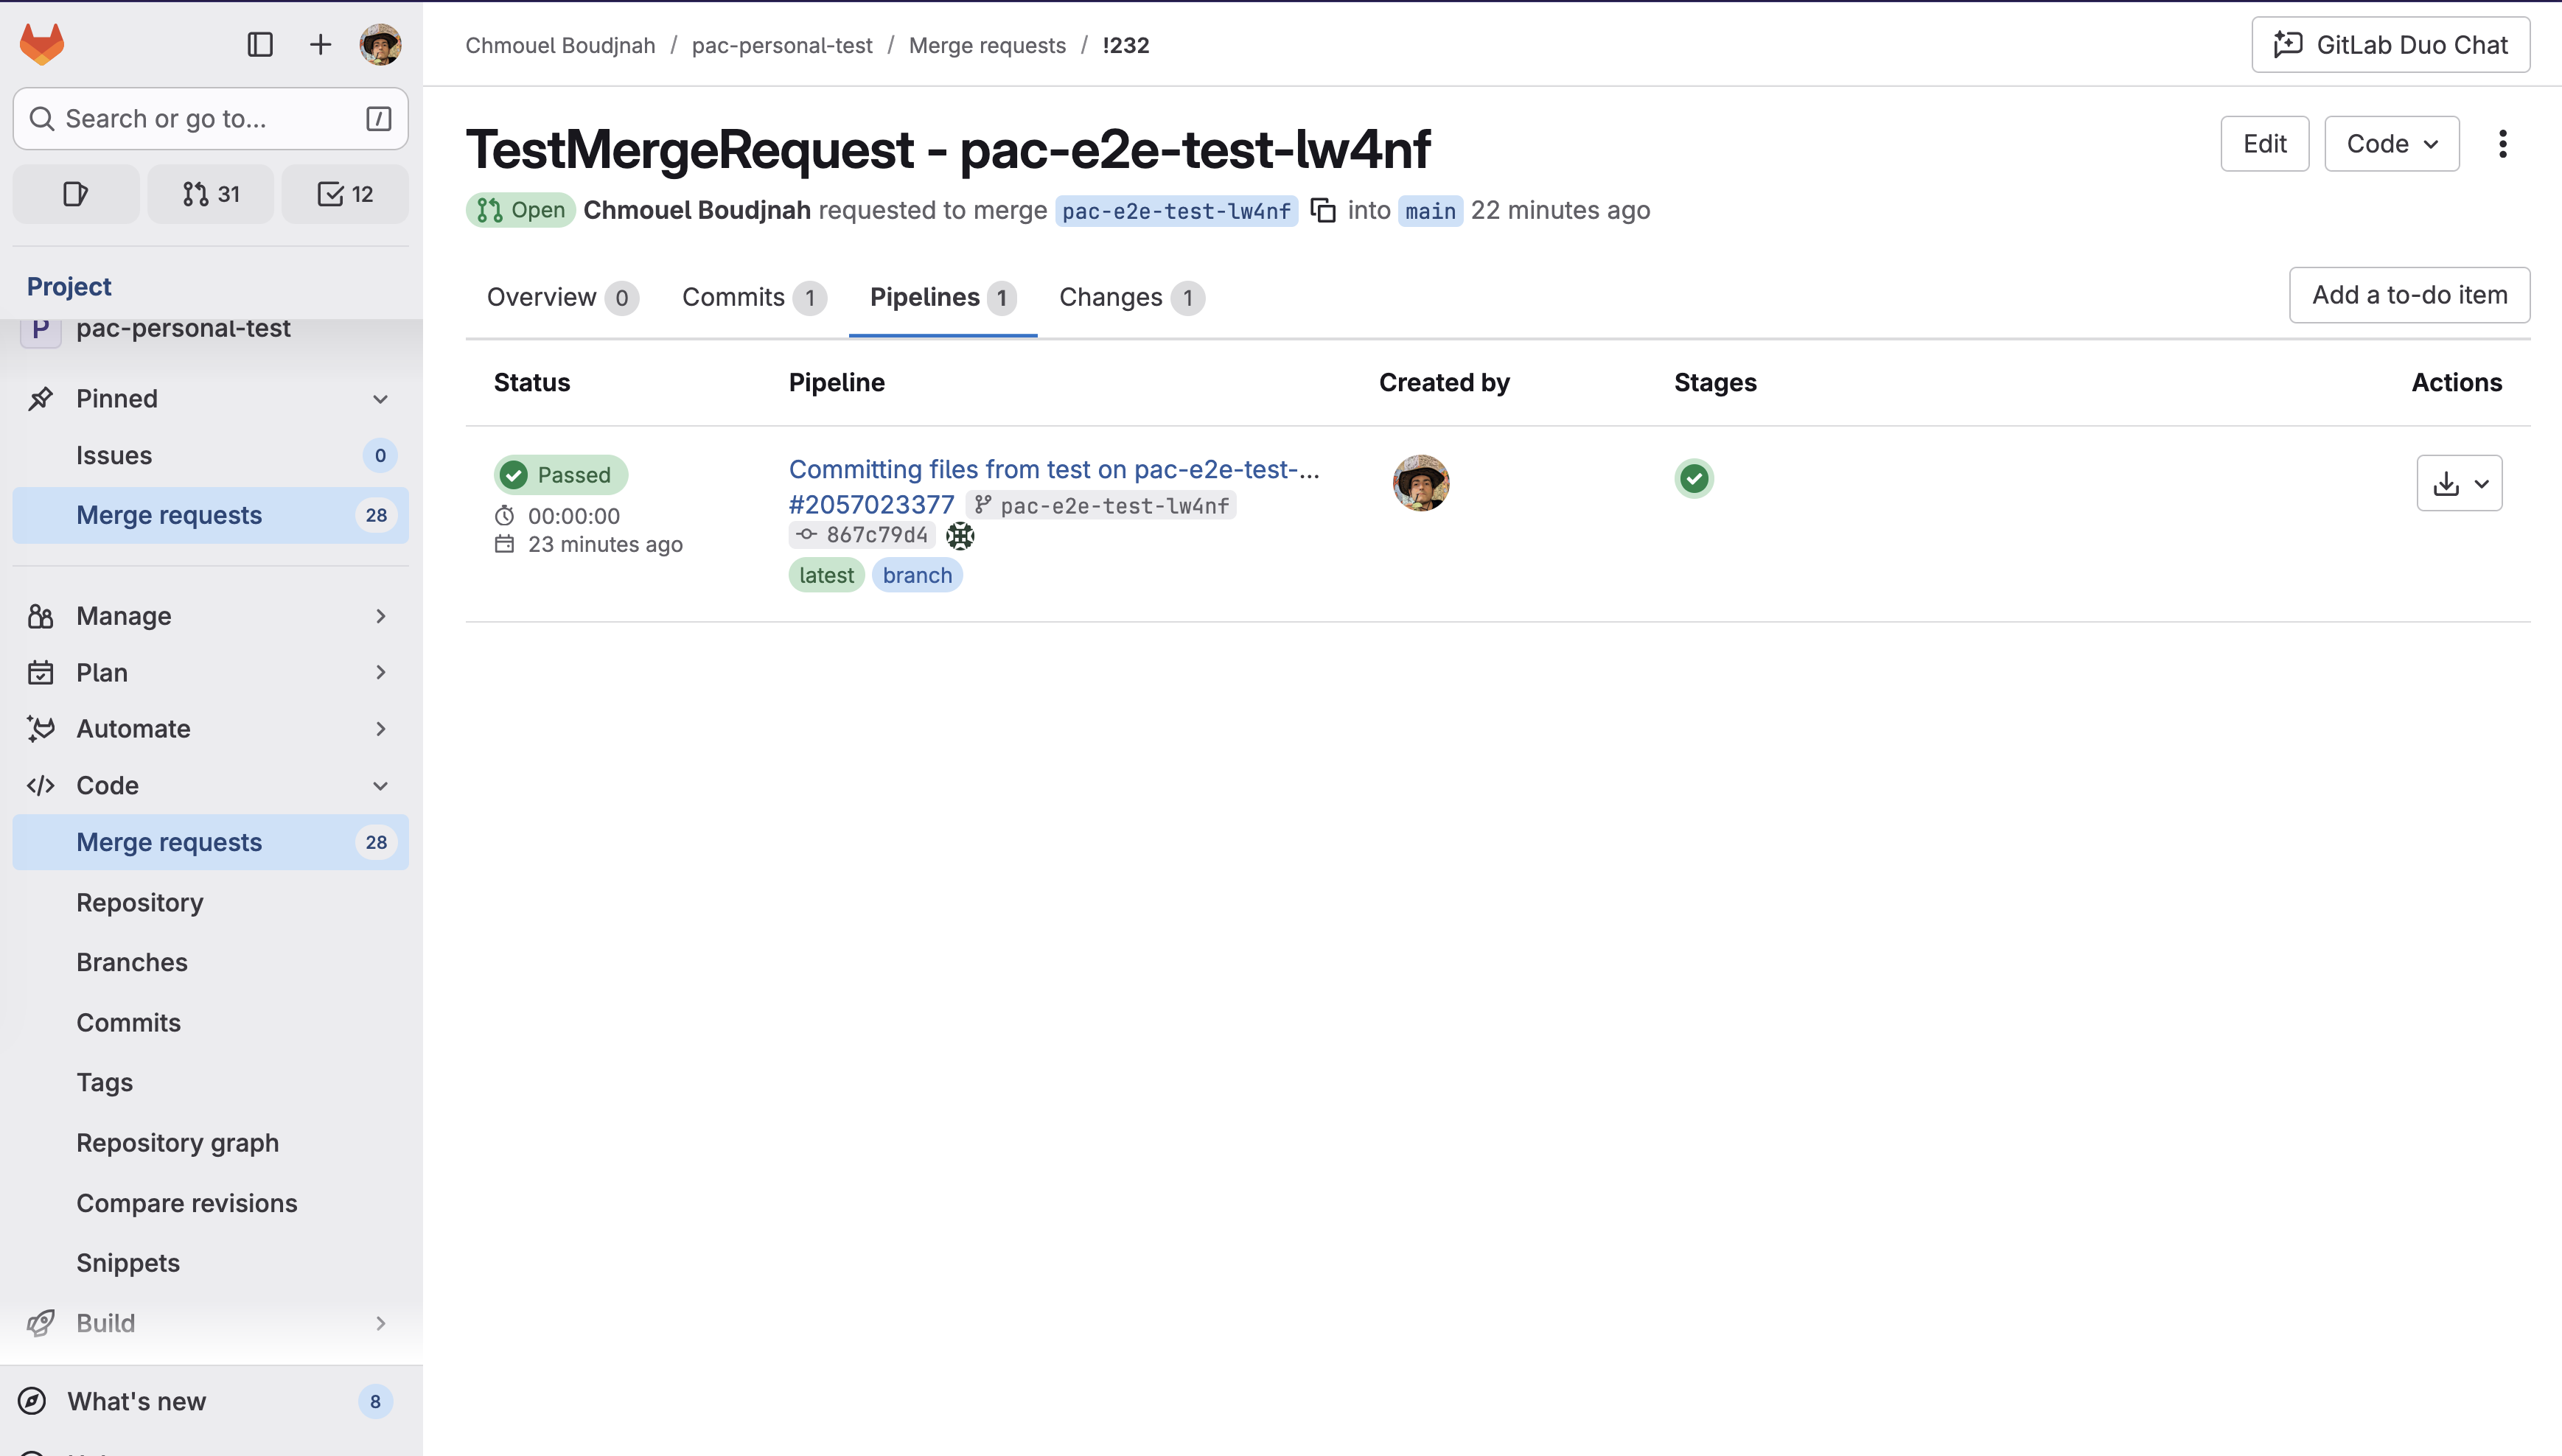
When status check reporting is unavailable, comments provide the same information (Comments show pipeline status, duration, and results).
Troubleshooting Fork Merge Requests
Why does my fork merge request show comments instead of status checks?
Symptom: Pipeline status appears as merge request comments, not in the “Pipelines” tab.
Root Cause: The GitLab token configured in your Repository CR lacks write access to the fork repository.
What Happened:
- PaC attempted to set status on fork → Failed (insufficient permissions)
- PaC attempted to set status on upstream → Failed (no CI pipeline on upstream for this commit)
- PaC fell back to MR comment → Succeeded ✓
This is working as designed. Comments provide the same pipeline information as status checks, just in a different format.
How can I get status checks instead of comments?
Choose the option that fits your security model:
Option 1: Bot Account (Recommended for Production)
Create a dedicated service account with minimal permissions:
- Create GitLab bot/service account
- Grant permissions:
- Read access: upstream and fork repositories
- Write access: fork repository (for status updates)
- CI pipeline access: upstream repository
- Generate personal access token with
apiscope for bot account - Use bot token in Repository CR secret
Advantages:
- Minimal permissions principle
- Clear audit trail (pipeline actions attributed to bot)
- No personal token rotation when team members change
Trade-off: Requires GitLab account administration
Option 2: Group-scoped Token
Use a Group Access Token with api scope. This token will have access to all repositories within the group:
Advantages:
- Simple to set up
- Works for both fork and upstream
Trade-offs:
- Broader permission scope
- Personal token tied to individual user account
Option 3: Accept Comment-based Status (Default)
Continue using project-scoped token with comment fallback:
Advantages:
- Most restrictive permissions
- No additional configuration needed
Trade-off: Status appears as comments instead of checks
Can I disable status comments entirely?
Yes. If you prefer not to see status comments on your merge requests, you can disable them by updating your Repository CR:
spec:
  settings:
    gitlab:
      comment_strategy: "disable_all"
See Repository CR documentation for details.
Important: Even with correct token permissions, upstream status updates may fail if GitLab doesn’t create a pipeline entry for that commit in the upstream repository. GitLab only creates pipeline entries when CI actually runs in that project.
Can I use forks for development within a single repository?
Yes. The restrictions only apply to cross-repository merge requests (fork to upstream).
If you are working within a single repository (even a fork used as your primary repo):
- Token needs
apiscope for that repository - Status checks appear normally
- No permission issues expected
Where can I learn more about the fallback mechanism?
See the detailed technical explanation and visual example in: Repository CR - GitLab comment strategy
Add Webhook Secret
If the webhook secret for an existing Repository CR has been deleted, or you want to add a new webhook to your project settings, use the tkn pac webhook add command. This command adds a webhook to the project repository settings and updates the webhook.secret key in the existing secret without modifying the Repository CR.
Below is the sample format for tkn pac webhook add:
$ tkn pac webhook add -n project-pipelines

✓ Setting up GitLab Webhook for Repository https://gitlab.com/repositories/project
? Please enter the project ID for the repository you want to be configured,
  project ID refers to an unique ID (e.g. 34405323) shown at the top of your GitLab project : 17103
👀 I have detected a controller url: https://pipelines-as-code-controller-openshift-pipelines.apps.awscl2.aws.ospqa.com
? Do you want me to use it? Yes
? Please enter the secret to configure the webhook for payload validation (default: TXArbGNDHTXU):  TXArbGNDHTXU
✓ Webhook has been created on your repository
🔑 Secret repositories-project has been updated with webhook secret in the project-pipelines namespace.Repository exists in a namespace other than the default namespace, use tkn pac webhook add [-n namespace].
In the above example, the Repository exists in the project-pipelines namespace rather than the default namespace, so the webhook was added in the project-pipelines namespace.Update Token
There are two ways to update the provider token for an existing Repository CR.
Update using the CLI
Use the tkn pac webhook update-token command to
update the provider token for an existing Repository CR.
Below is the sample format for tkn pac webhook update-token:
$ tkn pac webhook update-token -n repo-pipelines

? Please enter your personal access token:  **************************
🔑 Secret repositories-project has been updated with new personal access token in the project-pipelines namespace.Repository exists in a namespace other than the default namespace, use tkn pac webhook update-token [-n namespace].
In the above example, the Repository exists in the project-pipelines namespace rather than the default namespace, so the webhook token was updated in the project-pipelines namespace.Update using kubectl
When you have regenerated a new token, you must update it in the cluster. You can find the secret name in the Repository CR:
spec:
  git_provider:
    # url: "https://gitlab.example.com/ # Set this if you are using a private GitLab instance
    secret:
      name: "gitlab-webhook-config"
Replace $NEW_TOKEN and $target_namespace with your values:
kubectl -n $target_namespace patch secret gitlab-webhook-config -p "{\"data\": {\"provider.token\": \"$(echo -n $NEW_TOKEN|base64 -w0)\"}}"