On this page
GitHub Webhook
This page covers how to configure Pipelines-as-Code with a GitHub webhook. Use this method when you cannot create a GitHub App, for example in environments where App installation is restricted.
Because a webhook integration does not use the GitHub CheckRun API, Pipelines-as-Code reports task status as a comment on the pull request instead of through the Checks tab. GitOps comments such as /retest and /ok-to-test are also not supported. To restart CI, create a new commit:
git commit --amend -a --no-edit && git push --force-with-lease origin branchname
Prerequisites
- A running Pipelines-as-Code installation
- A GitHub personal access token (see below)
- The public URL of your Pipelines-as-Code controller route or ingress endpoint
Create a GitHub Personal Access Token
You need a personal access token so that Pipelines-as-Code can interact with the GitHub API. Follow this guide to create one:
Fine-grained token
If you want to generate a fine-grained token (which is more secure), you can scope your token to the repository you want tested.
The permissions needed are:
| Name | Access |
|---|---|
| Administration | Read Only |
| Metadata | Read Only |
| Content | Read Only |
| Commit statuses | Read and Write |
| Pull request | Read and Write |
| Webhooks | Read and Write |
Classic Tokens
The required scopes depend on your repository visibility.
For public repositories:
public_reposcope
For private repositories:
- The whole
reposcope
Store the generated token in a safe place, or you will have to recreate it.
For best security practice, use a short token expiration (such as the default 30 days). GitHub sends a notification email when your token is about to expire. Follow Update Token to replace an expired token with a new one.
admin:repo_hook.Webhook Configuration using the CLI
Use the tkn pac create repo command to
configure a webhook and create the Repository CR in one step.
You need a personal access token created with the admin:repo_hook scope. tkn pac uses this token to configure the webhook and stores it in a secret in the cluster, which the Pipelines-as-Code controller uses for accessing the repository. After configuring the webhook, you can update the token in the secret with just the scopes mentioned above.
Below is the sample format for tkn pac create repo
$ tkn pac create repo

? Enter the Git repository url (default: https://github.com/owner/repo):
? Please enter the namespace where the pipeline should run (default: repo-pipelines):
! Namespace repo-pipelines is not found
? Would you like me to create the namespace repo-pipelines? Yes
✓ Repository owner-repo has been created in repo-pipelines namespace
✓ Setting up GitHub Webhook for Repository https://github.com/owner/repo
👀 I have detected a controller url: https://pipelines-as-code-controller-openshift-pipelines.apps.awscl2.aws.ospqa.com
? Do you want me to use it? Yes
? Please enter the secret to configure the webhook for payload validation (default: sJNwdmTifHTs):  sJNwdmTifHTs
ℹ️ You now need to create a GitHub personal access token; please check the docs at https://is.gd/KJ1dDH for the required scopes
? Please enter the GitHub access token:  ****************************************
✓ Webhook has been created on repository owner/repo
🔑 Webhook Secret owner-repo has been created in the repo-pipelines namespace.
🔑 Repository CR owner-repo has been updated with webhook secret in the repo-pipelines namespace
ℹ Directory .tekton has been created.
✓ We have detected your repository using the programming language Go.
✓ A basic template has been created in /home/Go/src/github.com/owner/repo/.tekton/pipelinerun.yaml, feel free to customize it.
ℹ You can test your pipeline by pushing the generated template to your git repository
Webhook Configuration (Manual)
If you prefer to configure the webhook yourself, follow these steps.
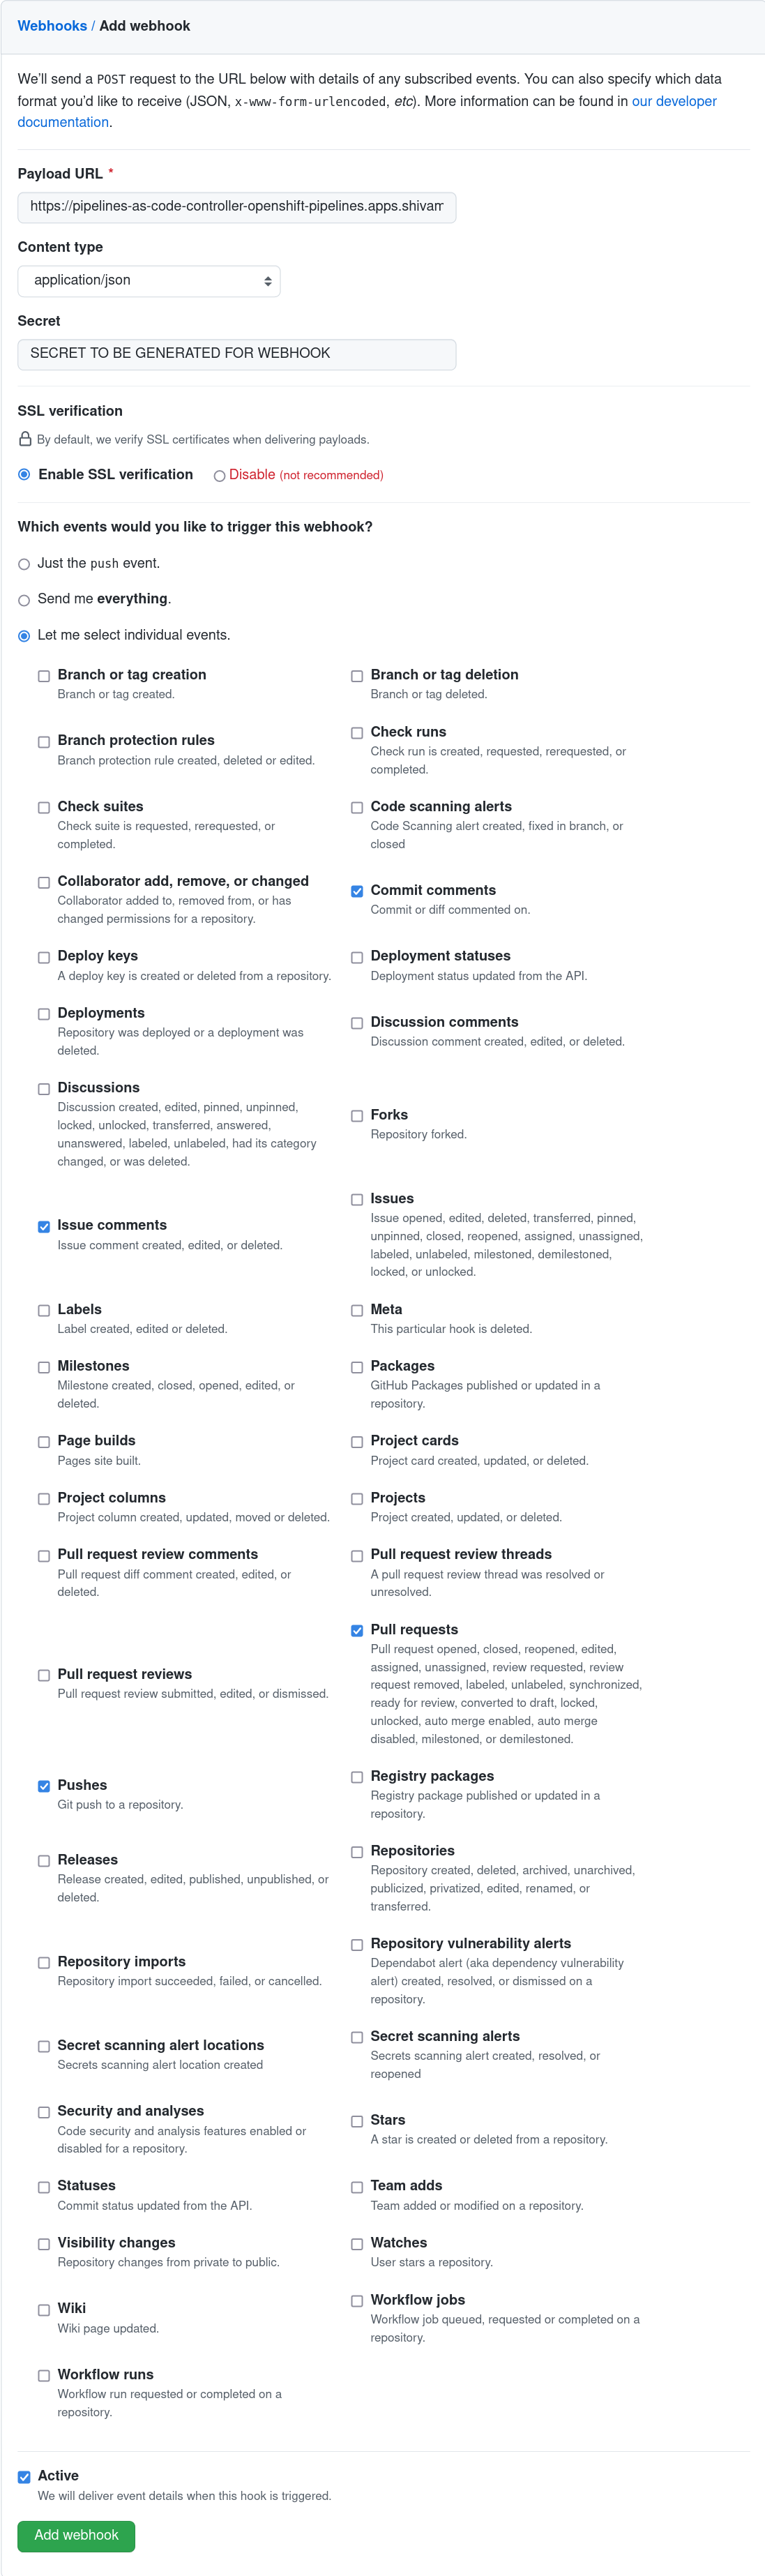
Go to your repository or organization Settings –> Webhooks and click on the Add webhook button.
Set the Payload URL to the Pipelines-as-Code controller public URL. On OpenShift, get the public URL of the Pipelines-as-Code controller like this:
echo https://$(oc get route -n pipelines-as-code pipelines-as-code-controller -o jsonpath='{.spec.host}')Choose Content type as application/json
Add a webhook secret or generate a random one with this command (store it for later use):
head -c 30 /dev/random | base64Click “Let me select individual events” and select these events:
- Commit comments
- Issue comments
- Pull request
- Pushes
Refer to this screenshot to verify you have properly configured the webhook.
Click on Add webhook
Create the Secret
Create a Kubernetes secret containing your personal token and the webhook secret in the target-namespace (the namespace where your pipeline CI runs):
kubectl -n target-namespace create secret generic github-webhook-config \
  --from-literal provider.token="TOKEN_AS_GENERATED_PREVIOUSLY" \
  --from-literal webhook.secret="SECRET_AS_SET_IN_WEBHOOK_CONFIGURATION"
Create the Repository CR
Create a Repository CR that references the secret:
---
apiVersion: "pipelinesascode.tekton.dev/v1alpha1"
kind: Repository
metadata:
  name: my-repo
  namespace: target-namespace
spec:
  url: "https://github.com/owner/repo"
  git_provider:
    secret:
      name: "github-webhook-config"
      # Set this if you have a different key in your secret
      # key: "provider.token"
    webhook_secret:
      name: "github-webhook-config"
      # Set this if you have a different key for your secret
      # key: "webhook.secret"
Notes
- Pipelines-as-Code always assumes that the secret is in the same namespace where the Repository CR has been created.
Add Webhook Secret
If the webhook secret for an existing Repository CR has been deleted, or you want to add a new webhook to your project settings, use the tkn pac webhook add command. This command adds a webhook to the project repository settings and updates the webhook.secret key in the existing secret without modifying the Repository CR.
Below is the sample format for tkn pac webhook add:
$ tkn pac webhook add -n repo-pipelines

✓ Setting up GitHub Webhook for Repository https://github.com/owner/repo
👀 I have detected a controller url: https://pipelines-as-code-controller-openshift-pipelines.apps.awscl2.aws.ospqa.com
? Do you want me to use it? Yes
? Please enter the secret to configure the webhook for payload validation (default: AeHdHTJVfAeH):  AeHdHTJVfAeH
✓ Webhook has been created on repository owner/repo
🔑 Secret owner-repo has been updated with webhook secret in the repo-pipelines namespace.Repository exists in a namespace other than the default namespace, use tkn pac webhook add [-n namespace].
In the above example, the Repository exists in the repo-pipelines namespace rather than the default namespace, so the webhook was added in the repo-pipelines namespace.Update Token
There are two ways to update the provider token for an existing Repository CR.
Update using the CLI
Use the tkn pac webhook update-token command to
update the provider token for an existing Repository CR.
Below is the sample format for tkn pac webhook update-token:
$ tkn pac webhook update-token -n repo-pipelines

? Please enter your personal access token:  ****************************************
🔑 Secret owner-repo has been updated with new personal access token in the repo-pipelines namespace.Repository exists in a namespace other than the default namespace, use tkn pac webhook update-token [-n namespace].
In the above example, the Repository exists in the repo-pipelines namespace rather than the default namespace, so the webhook token was updated in the repo-pipelines namespace.Update using kubectl
When you have regenerated a new token, you must update it in the cluster. You can find the secret name in the Repository CR:
spec:
  git_provider:
    secret:
      name: "github-webhook-config"
Replace $NEW_TOKEN and $target_namespace with your values:
kubectl -n $target_namespace patch secret github-webhook-config -p "{\"data\": {\"provider.token\": \"$(echo -n $NEW_TOKEN|base64 -w0)\"}}"