Use Pipelines-as-Code with Bitbucket Cloud #
Pipelines-as-Code supports Bitbucket Cloud through a webhook.
Follow the Pipelines-as-Code installation according to your Kubernetes cluster.
Create Bitbucket API Token #
Follow this guide to create an API token.
Check these boxes to add the permissions to the token:
- read:workspace:bitbucket
- read:pullrequest:bitbucket
- read:repository:bitbucket
- write:repository:bitbucket
Keep the generated token noted somewhere, or otherwise you will have to recreate it.
Create a Repository and configure webhook
#
There are two ways to create the Repository and configure the webhook:
Create a Repository and configure webhook using the tkn pac tool
#
Use the
tkn pac create repocommand to configure a webhook and create theRepositoryCR.You need to have a App Password created.
tkn pacwill use this token to configure the webhook, and add it in a secret in the cluster which will be used by the Pipelines-as-Code controller for accessing theRepository.
Below is the sample format for tkn pac create repo
$ tkn pac create repo

? Enter the Git repository url (default: https://bitbucket.org/workspace/repo):
? Please enter the namespace where the pipeline should run (default: repo-pipelines):
! Namespace repo-pipelines is not found
? Would you like me to create the namespace repo-pipelines? Yes
✓ Repository workspace-repo has been created in repo-pipelines namespace
✓ Setting up Bitbucket Webhook for Repository https://bitbucket.org/workspace/repo
? Please enter your bitbucket cloud username:  <username>
ℹ ️You now need to create a Bitbucket Cloud app password, please checkout the docs at https://is.gd/fqMHiJ for the required permissions
? Please enter the Bitbucket Cloud app password:  ************************************
👀 I have detected a controller url: https://pipelines-as-code-controller-openshift-pipelines.apps.awscl2.aws.ospqa.com
? Do you want me to use it? Yes
✓ Webhook has been created on repository workspace/repo
🔑 Webhook Secret workspace-repo has been created in the repo-pipelines namespace.
🔑 Repository CR workspace-repo has been updated with webhook secret in the repo-pipelines namespace
ℹ Directory .tekton has been created.
✓ A basic template has been created in /home/Go/src/bitbucket/repo/.tekton/pipelinerun.yaml, feel free to customize it.
ℹ You can test your pipeline by pushing the generated template to your git repository
Create a Repository and configure webhook manually
#
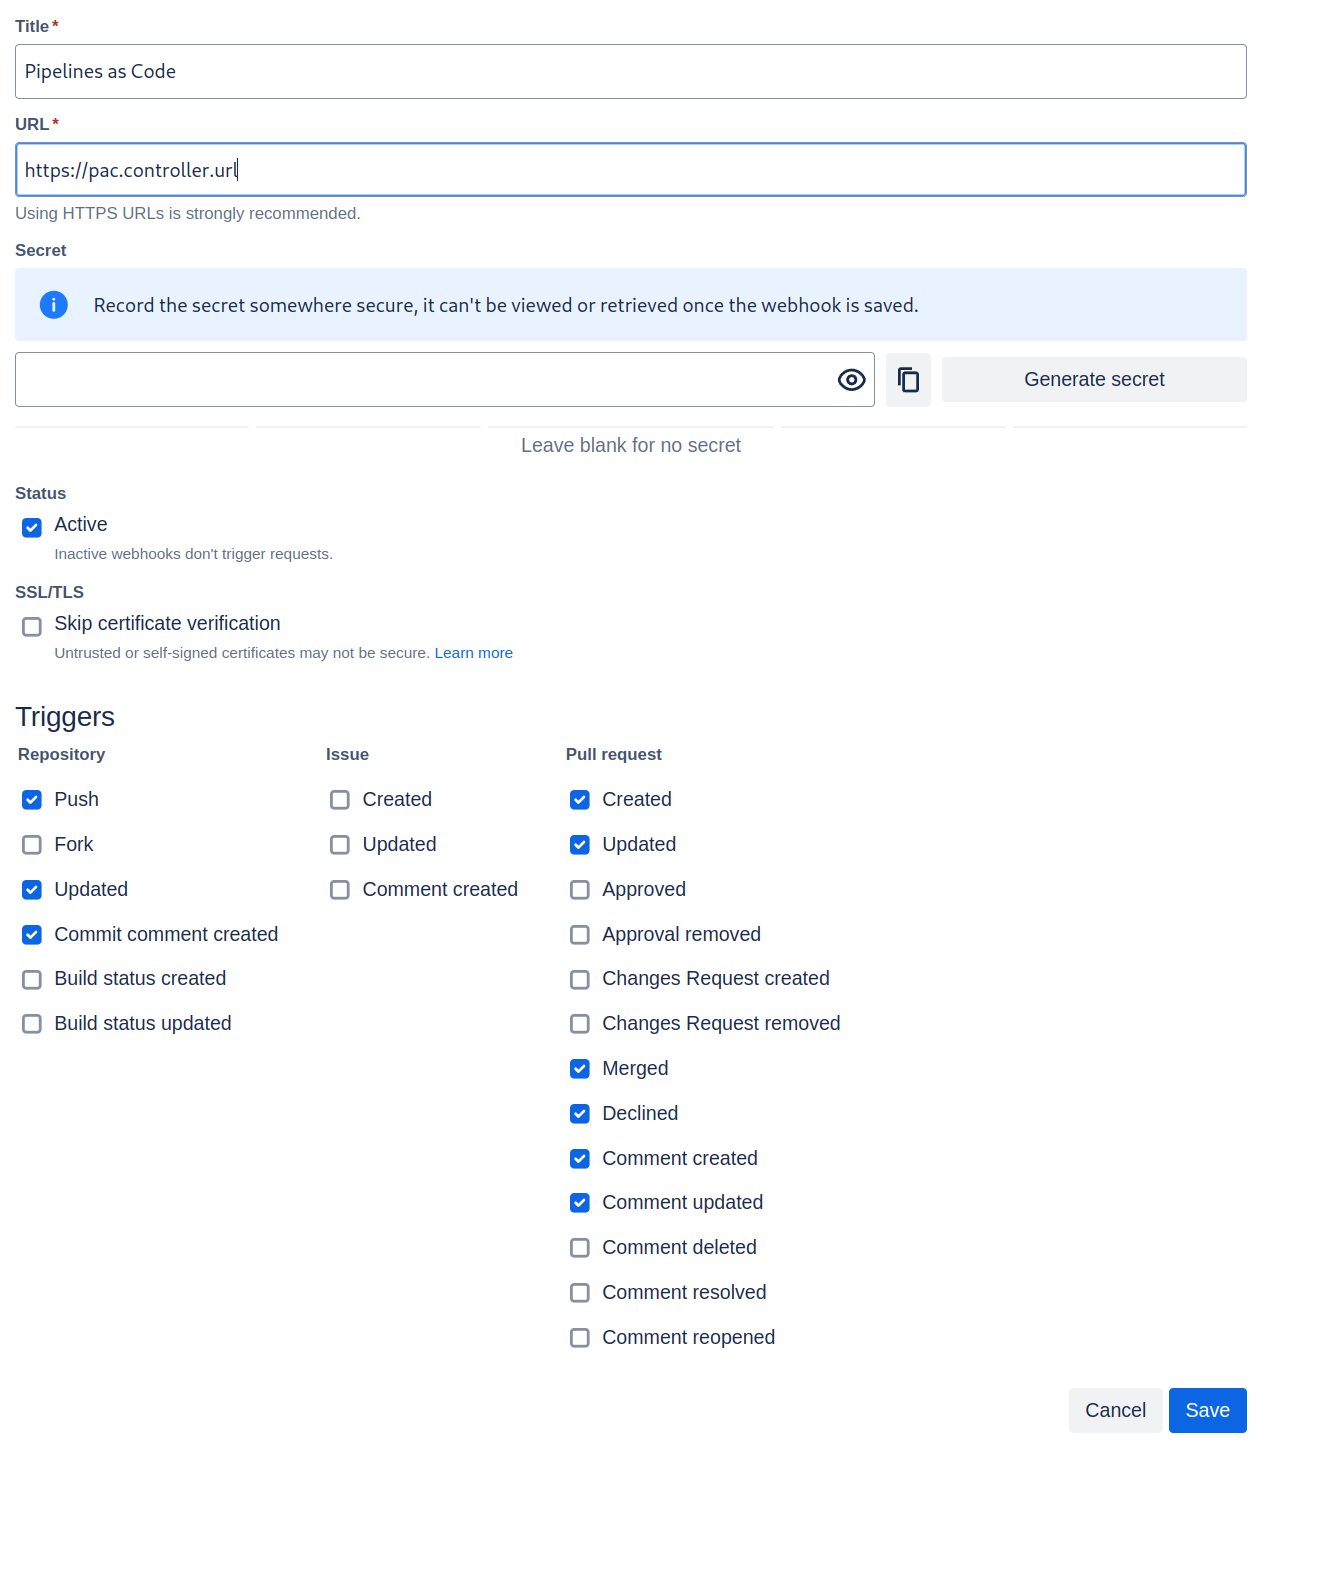
From the left navigation pane of your Bitbucket Cloud repository, go to Repository settings –> Webhooks tab and click on the Add webhook button.
Set a Title (i.e: Pipelines-as-Code)
Set the URL to Pipelines-as-Code controller public URL. On OpenShift, you can get the public URL of the Pipelines-as-Code controller like this:
echo https://$(oc get route -n pipelines-as-code pipelines-as-code-controller -o jsonpath='{.spec.host}')The individual events to select are:
- Repository -> Push
- Repository -> Updated
- Repository -> Commit comment created
- Pull Request -> Created
- Pull Request -> Updated
- Pull Request -> Merged
- Pull Request -> Declined
- Pull Request -> Comment created
- Pull Request -> Comment updated
Refer to this screenshot to verify you have properly configured the webhook.
Click on Save.
You can now create a
Repository CRD. It will have:- A Username (i.e: your Bitbucket username).
- A reference to a Kubernetes Secret containing the App Password as generated previously for Pipelines-as-Code operations.
Create the secret with the app password in the
target-namespace:kubectl -n target-namespace create secret generic bitbucket-cloud-token \ --from-literal provider.token="APP_PASSWORD_AS_GENERATED_PREVIOUSLY"Create the
RepositoryCRD with the secret field referencing it. For example:
  ---
  apiVersion: "pipelinesascode.tekton.dev/v1alpha1"
  kind: Repository
  metadata:
    name: my-repo
    namespace: target-namespace
  spec:
    url: "https://bitbucket.com/workspace/repo"
    git_provider:
      user: "your_atlassian_email_id"
      secret:
        name: "bitbucket-cloud-token"
        # Set this if you have a different key in your secret
        # key: “provider.token“
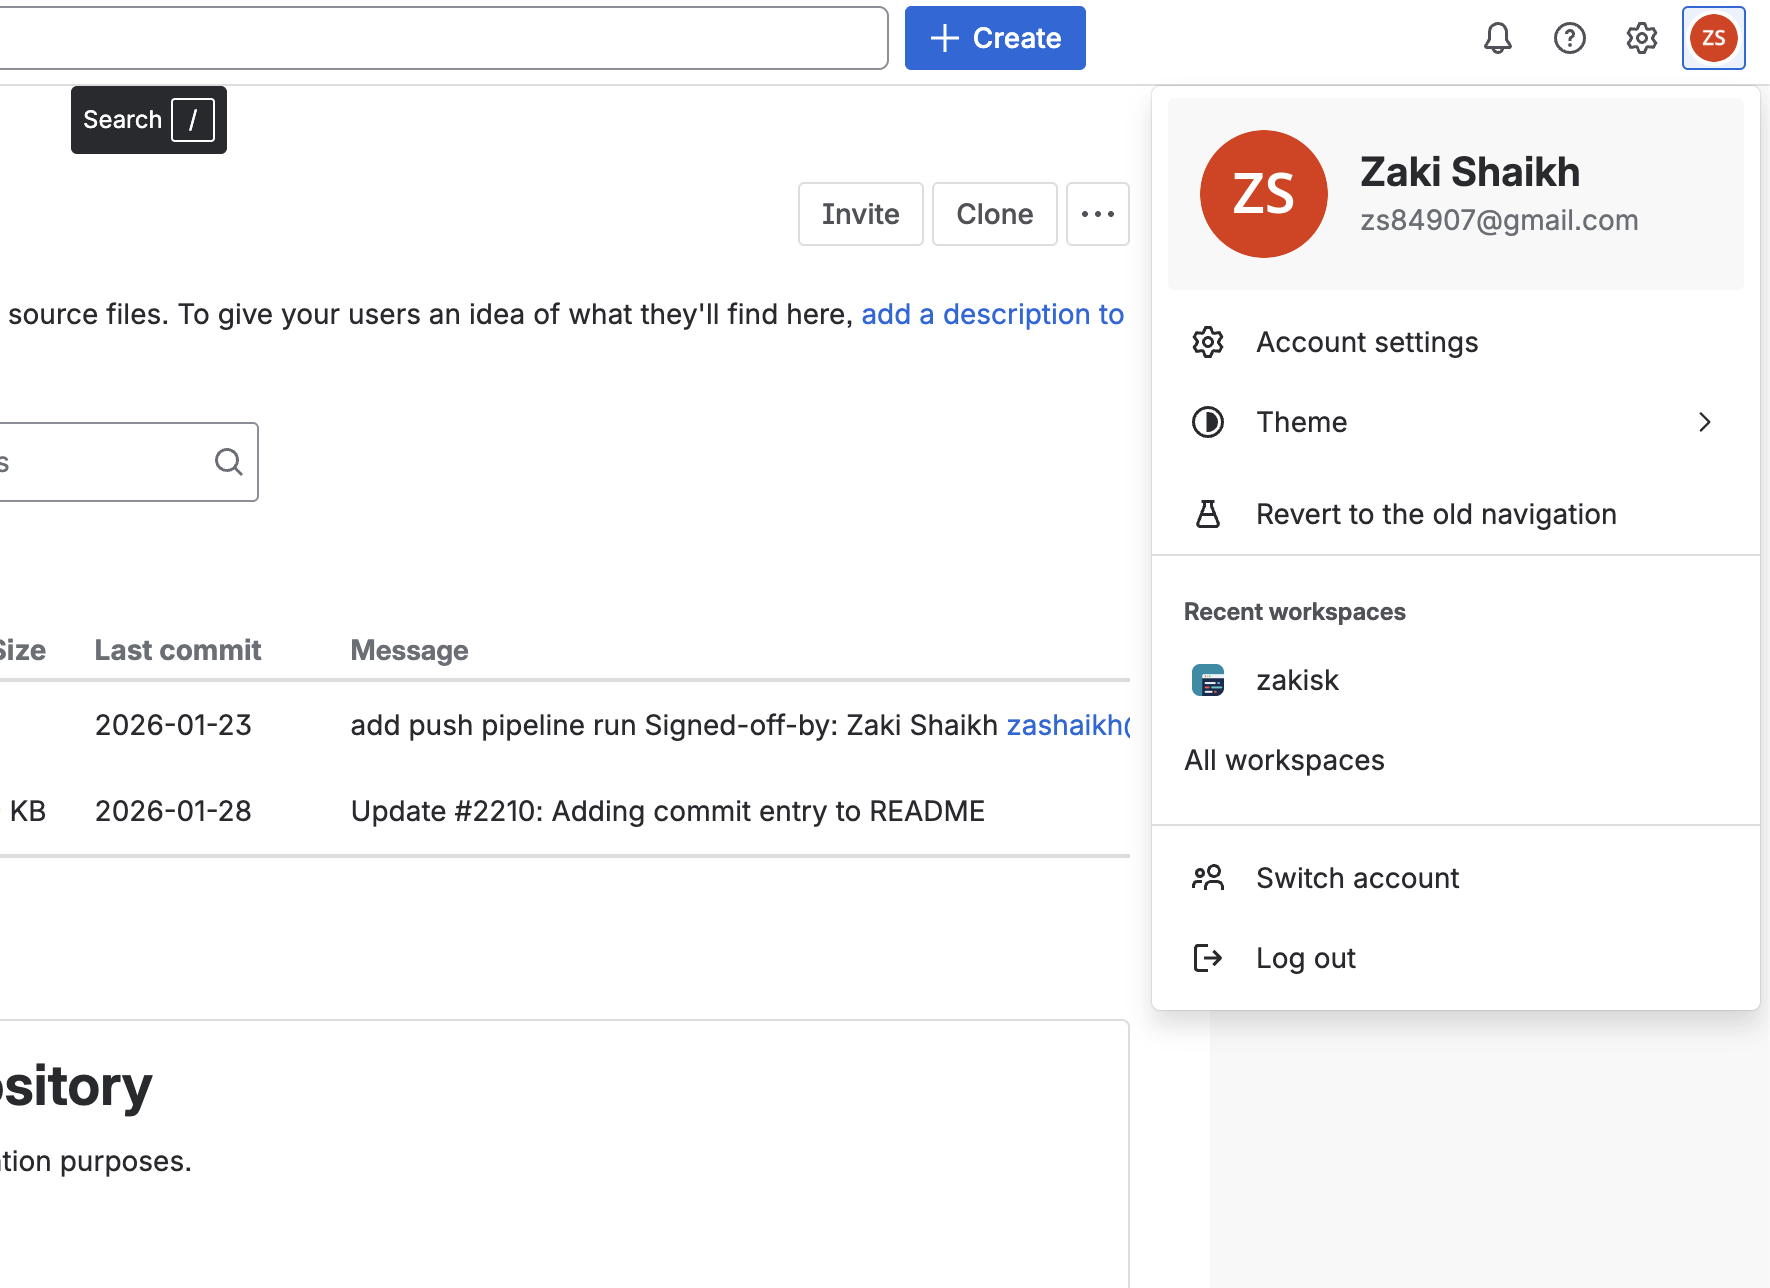
Please note that you must use your Bitbucket/Atlassian account email address in the user field of the Repository CR. To find your email address, click on your profile icon at the top-left corner in the Bitbucket Cloud UI (see image below), go to Account Settings, and scroll down to locate your email address.
Bitbucket Cloud Notes #
The
git_provider.secretkey cannot reference to a secret in another namespace. Pipelines-as-Code always assumes that it will be in the same namespace where theRepositoryhas been created.The
tkn pac createandtkn pac bootstrapcommands are not supported on Bitbucket Cloud.
You can only reference a user by the
ACCOUNT_IDin a owner file. For reason see here:
There is no webhook secret support in Bitbucket Cloud. To secure the payload and prevent hijacking of the CI, Pipelines-as-Code will fetch the IP addresses list from https://ip-ranges.atlassian.com/ and ensure that the webhook receptions come only from the Bitbucket Cloud IPs.
If you want to add some IP addresses or networks, you can add them to the
bitbucket-cloud-additional-source-ipkey in the pipelines-as-codeConfigMapin thepipelines-as-codenamespace. You can add multiple network or IPs separated by a comma.If you want to disable this behavior you can set the
bitbucket-cloud-check-source-ipkey tofalsein the pipelines-as-codeConfigMapin thepipelines-as-codenamespace.
Add webhook secret #
- For an existing
Repository, if webhook secret has been deleted (or you want to add a new webhook to project settings) for Bitbucket Cloud, usetkn pac webhook addcommand to add a webhook to project repository settings, as well as update thewebhook.secretkey in the existingSecretobject without updatingRepository.
Below is the sample format for tkn pac webhook add
$ tkn pac webhook add -n repo-pipelines

✓ Setting up Bitbucket Webhook for Repository https://bitbucket.org/workspace/repo
? Please enter your bitbucket cloud username:  <username>
👀 I have detected a controller url: https://pipelines-as-code-controller-openshift-pipelines.apps.awscl2.aws.ospqa.com
? Do you want me to use it? Yes
✓ Webhook has been created on repository workspace/repo
🔑 Secret workspace-repo has been updated with webhook secret in the repo-pipelines namespace.
Note: If Repository exists in a namespace other than the default namespace, use tkn pac webhook add [-n namespace].
In the above example, Repository exists in the repo-pipelines namespace rather than the default namespace; therefore
the webhook was added in the repo-pipelines namespace.
Update token #
There are two ways to update the provider token for the existing Repository:
Update using tkn pac cli #
- Use the
tkn pac webhook update-tokencommand which will update provider token for the existingRepositoryCR.
Below is the sample format for tkn pac webhook update-token
$ tkn pac webhook update-token -n repo-pipelines

? Please enter your personal access token:  ************************************
🔑 Secret workspace-repo has been updated with new personal access token in the repo-pipelines namespace.
NOTE: If Repository exists in a namespace other than the default namespace, use tkn pac webhook update-token [-n namespace].
In the above example, Repository exists in the repo-pipelines namespace rather than the default namespace; therefore
the webhook token updated in the repo-pipelines namespace.
Update by changing Repository YAML or using kubectl patch command
#
When you have regenerated an app password, you must update it in the cluster.
For example, you can replace $password and $target_namespace with their respective values:
You can find the secret name in the Repository CR.
spec:
  git_provider:
    secret:
      name: "bitbucket-cloud-token"
kubectl -n $target_namespace patch secret bitbucket-cloud-token -p "{\"data\": {\"provider.token\": \"$(echo -n $password|base64 -w0)\"}}"