On this page
- Prerequisites
- Installing Pipelines-as-Code
- Pipelines-as-Code installation
- Webhook forwarder
- Tekton Dashboard
- GitHub Application
- Creating a GitHub repository
- Install the GitHub Application on your repository
- Clone the newly created GitHub repository
- Create a Repository CR
- Creating a pull request
- Fixing the error and pushing again
- Conclusion
- Summary
Getting Started Guide
This guide walks you through the end-to-end setup of Pipelines-as-Code: installing it on your cluster, creating a GitHub Application, configuring a Repository CR, and testing the setup with a pull request. By the end, you will have a working CI pipeline that runs automatically on every PR.
Prerequisites
Before you begin, make sure you have the following in place:
- A Kubernetes cluster like Kind, Minikube, or OpenShift Local
- The OpenShift Pipelines Operator installed or Tekton Pipelines installed on your cluster
- The Tekton CLI installed, and the Pipelines-as-Code CLI plugin (tkn-pac) installed
Installing Pipelines-as-Code
You need Pipelines-as-Code running on your cluster before you can connect it to a Git repository. There are multiple ways to install it. The easiest way is to have it managed by the OpenShift Pipelines Operator, which installs Pipelines-as-Code by default.
You can also install it manually by applying the YAML files to your cluster or use tkn pac bootstrap to do it for you. The tkn pac bootstrap command is the fastest way to get started for development and testing.
If you are running Pipelines-as-Code in production, consider installing using a GitOps tool like OpenShift GitOps or ArgoCD following the manual installation instructions.
This guide uses tkn pac bootstrap to get you started.
--github-hostname flag with the hostname of your GitHub Enterprise instance.Pipelines-as-Code installation
When you run tkn pac bootstrap, it first checks whether Pipelines-as-Code is already installed on your cluster. If it is not, you are prompted to install it.
% tkn pac bootstrap
=> Checking if Pipelines-as-Code is installed.
🕵️ Pipelines-as-Code doesn't seem to be installed in the pipelines-as-code namespace.
? Do you want me to install Pipelines-as-Code v0.19.2? (Y/n)
Press Y to install it.
Webhook forwarder
Your Git provider needs to reach the Pipelines-as-Code controller over the internet to deliver webhook events. If your cluster is not publicly accessible, you need a forwarder.
The next question asks whether to install the webhook forwarding tool gosmee. This prompt only appears if you are not running on OpenShift. Installing gosmee is optional, but it is the most straightforward way to make the controller reachable by GitHub.
Pipelines-as-Code does not install an Ingress object to allow the controller to be accessed from the internet.
We can install a webhook forwarder called gosmee (https://github.com/chmouel/gosmee) using a https://hook.pipelinesascode.com URL.
This will let your git platform provider (e.g., GitHub) reach the controller without requiring public access.
? Do you want me to install the gosmee forwarder? (Y/n)
💡 Your gosmee forward URL has been generated: https://hook.pipelinesascode.com/zZVuUUOkCzPD
Tekton Dashboard
Having a dashboard lets you view PipelineRun logs and details directly from links that Pipelines-as-Code posts on your pull requests.
If you have the Tekton Dashboard installed, Pipelines-as-Code can use it to link to PipelineRun logs and details. On OpenShift, it automatically detects the OpenShift console Route.
👀 We have detected a tekton dashboard install on http://dashboard.paac-127-0-0-1.nip.io
? Do you want me to use it? Yes
GitHub Application
A GitHub Application is how Pipelines-as-Code authenticates with GitHub, receives webhook events, and posts status checks on your pull requests. While Pipelines-as-Code also supports a simple webhook, a GitHub Application provides the best integration experience.
Enter the name of the GitHub Application you want to create. This name must be unique across GitHub, so choose a name that does not conflict with existing applications.
? Enter the name of your GitHub application: My PAAC Application
After you press Enter, the CLI opens your web browser to https://localhost:8080, which displays a button to create the GitHub Application. Click the button to be redirected to GitHub, where you see the following screen:
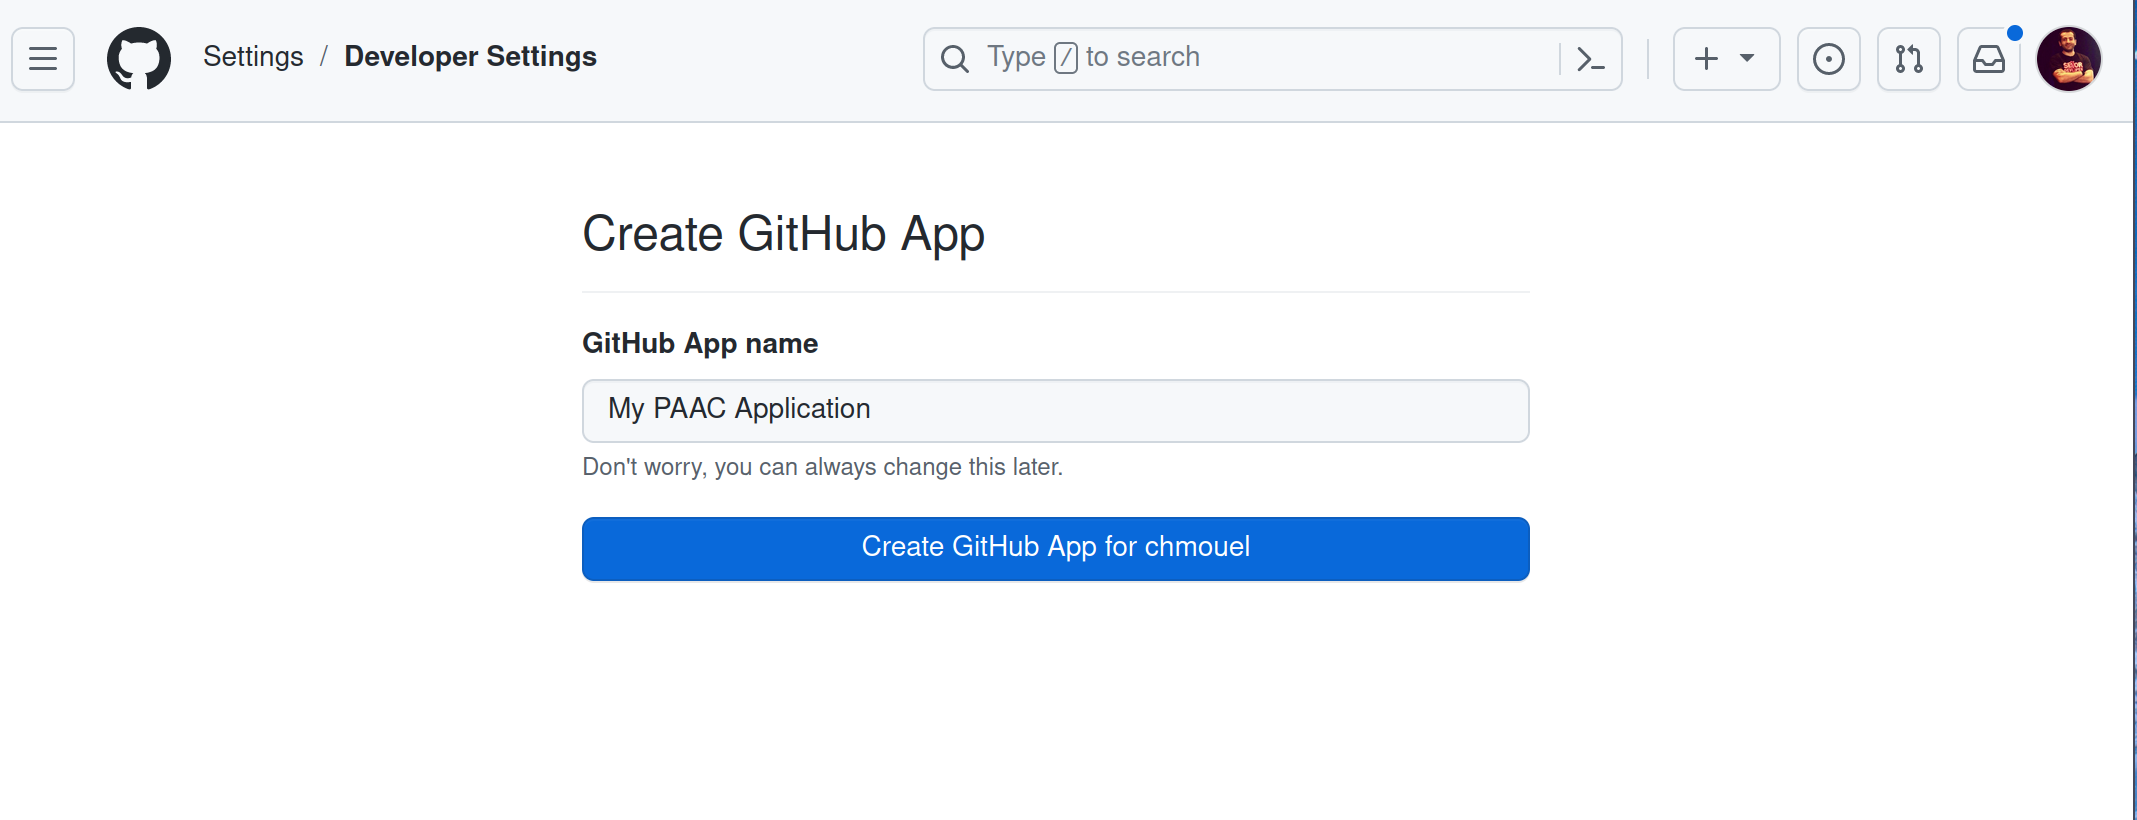
Click the “Create GitHub App” button (or change the name first if needed). Return to the terminal where tkn pac bootstrap is running. The output confirms that the GitHub Application has been created and a secret token has been generated.
🔑 Secret pipelines-as-code-secret has been created in the pipelines-as-code namespace
🚀 You can now add your newly created application to your repository by going to this URL:

https://github.com/apps/my-paac-application

💡 Don't forget to run "tkn pac create repository" to create a new Repository CR on your cluster.
Visit the newly created GitHub Application by opening the URL shown in the output. Click the “App settings” button on that page to inspect the GitHub Application configuration. The tkn pac bootstrap command configures all required settings, but you can adjust advanced options there if necessary.
Creating a GitHub repository
Before you can create a Repository CR, you need a Git repository for Pipelines-as-Code to watch. If you already have one, skip to the next section.
Create a repository using this template:
https://github.com/openshift-pipelines/pac-demo/generate
Choose your username (e.g., chmouel) and a repository name (e.g., pac-demo), then click the “Create repository from template” button.
Your repository is now created on GitHub at https://github.com/yourusername/pac-demo.
Install the GitHub Application on your repository
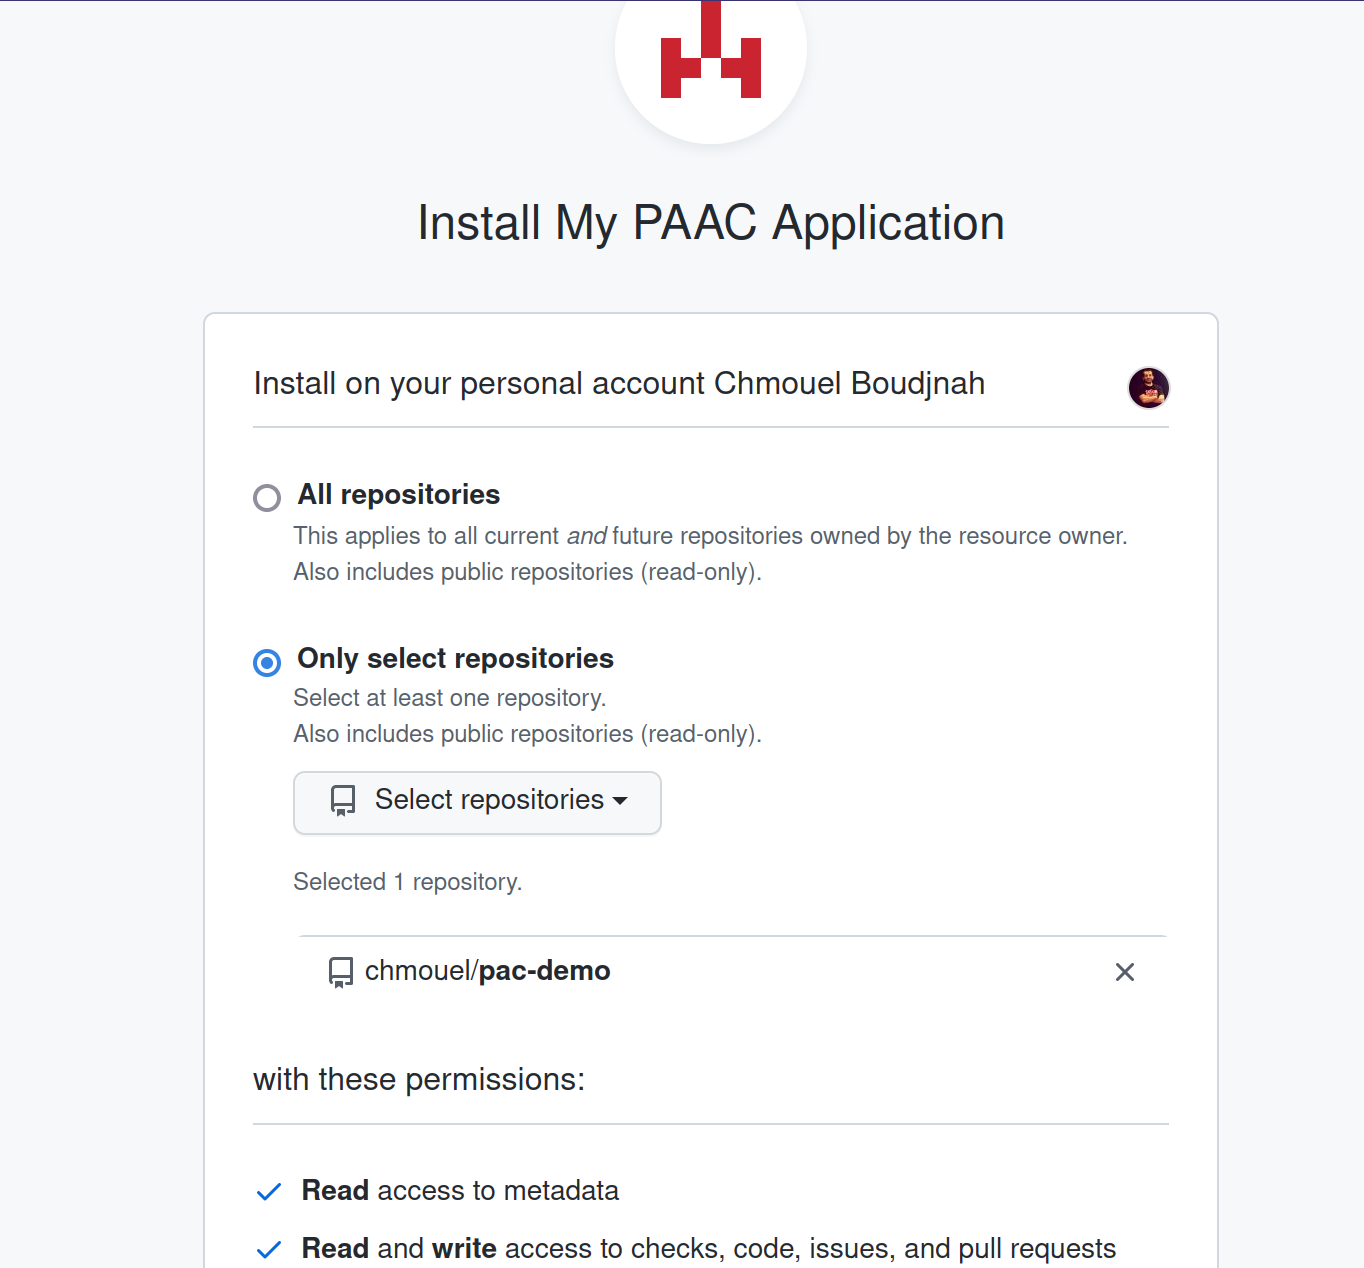
The GitHub Application must be installed on the specific repository you want Pipelines-as-Code to manage. This grants the application permission to receive events and post status checks.
Add the GitHub Application to your GitHub repository:
- Go to the GitHub App URL provided by
tkn pac bootstrap, for example: https://github.com/apps/my-paac-application. - Click on the “Install” button.
- Choose the repository you just created under your username.
The installation screen looks similar to this:
Clone the newly created GitHub repository
You need a local clone so the tkn pac CLI can read Git metadata and provide helpful defaults for subsequent commands. Clone the repository and change into its directory:
git clone https://github.com/$yourusername/pac-demo
cd pac-demo
Create a Repository CR
The Repository CR is the primary configuration object for Pipelines-as-Code. It tells Pipelines-as-Code which Git repository to watch, which namespace to run PipelineRuns in, and how to authenticate with the Git provider. Without a Repository CR, Pipelines-as-Code has no way to connect incoming webhook events to your cluster.
Create a Repository CR with the command:
tkn pac create repositoryThe command detects the Git information of the current repository and lets you confirm or change the values.
? Enter the Git repository url (default: https://github.com/chmouel/pac-demo):
Press Enter to accept the default value. The next prompt asks which namespace to use for running your CI. Each Repository CR runs PipelineRuns in its own namespace, isolating workloads. Accept the default or enter a different namespace:
? Please enter the namespace where the pipeline should run (default: pac-demo-pipelines):
! Namespace pac-demo-pipelines is not found
? Would you like me to create the namespace pac-demo-pipelines? (Y/n)
After confirmation, the command creates the Repository CR in your cluster and generates a .tekton/ directory containing a pipelinerun.yaml file.
ℹ Directory .tekton has been created.
✓ We have detected your repository using the programming language Go.
✓ A basic template has been created in /tmp/pac-demo/.tekton/pipelinerun.yaml, feel free to customize it.
ℹ You can test your pipeline by pushing the generated template to your git repository
The tkn pac create repository command detects the programming language of the repository and generates a tailored template. For a Go repository, it adds the golangci-lint linter as a task to the PipelineRun.
Open the file .tekton/pipelinerun.yaml to inspect its contents. The file includes comments explaining how it works.
Creating a pull request
With the Repository CR created and .tekton/pipelinerun.yaml generated, you can now test the full integration. When you open a pull request, Pipelines-as-Code detects the event, finds matching pipeline definitions in the .tekton/ directory, and runs them automatically.
First, create a branch for the pull request.
git checkout -b tektonciCommit the .tekton/pipelinerun.yaml file and push the branch to the repository:
git add .
git commit -m "Adding Tekton CI"
git push origin tektonciAfter pushing the branch, create a new pull request by visiting the following URL (replace yourusername with your GitHub username):
https://github.com/yourusername/pac-demo/pull/new/tektonci
Once you create the pull request, Pipelines-as-Code triggers a PipelineRun on it:
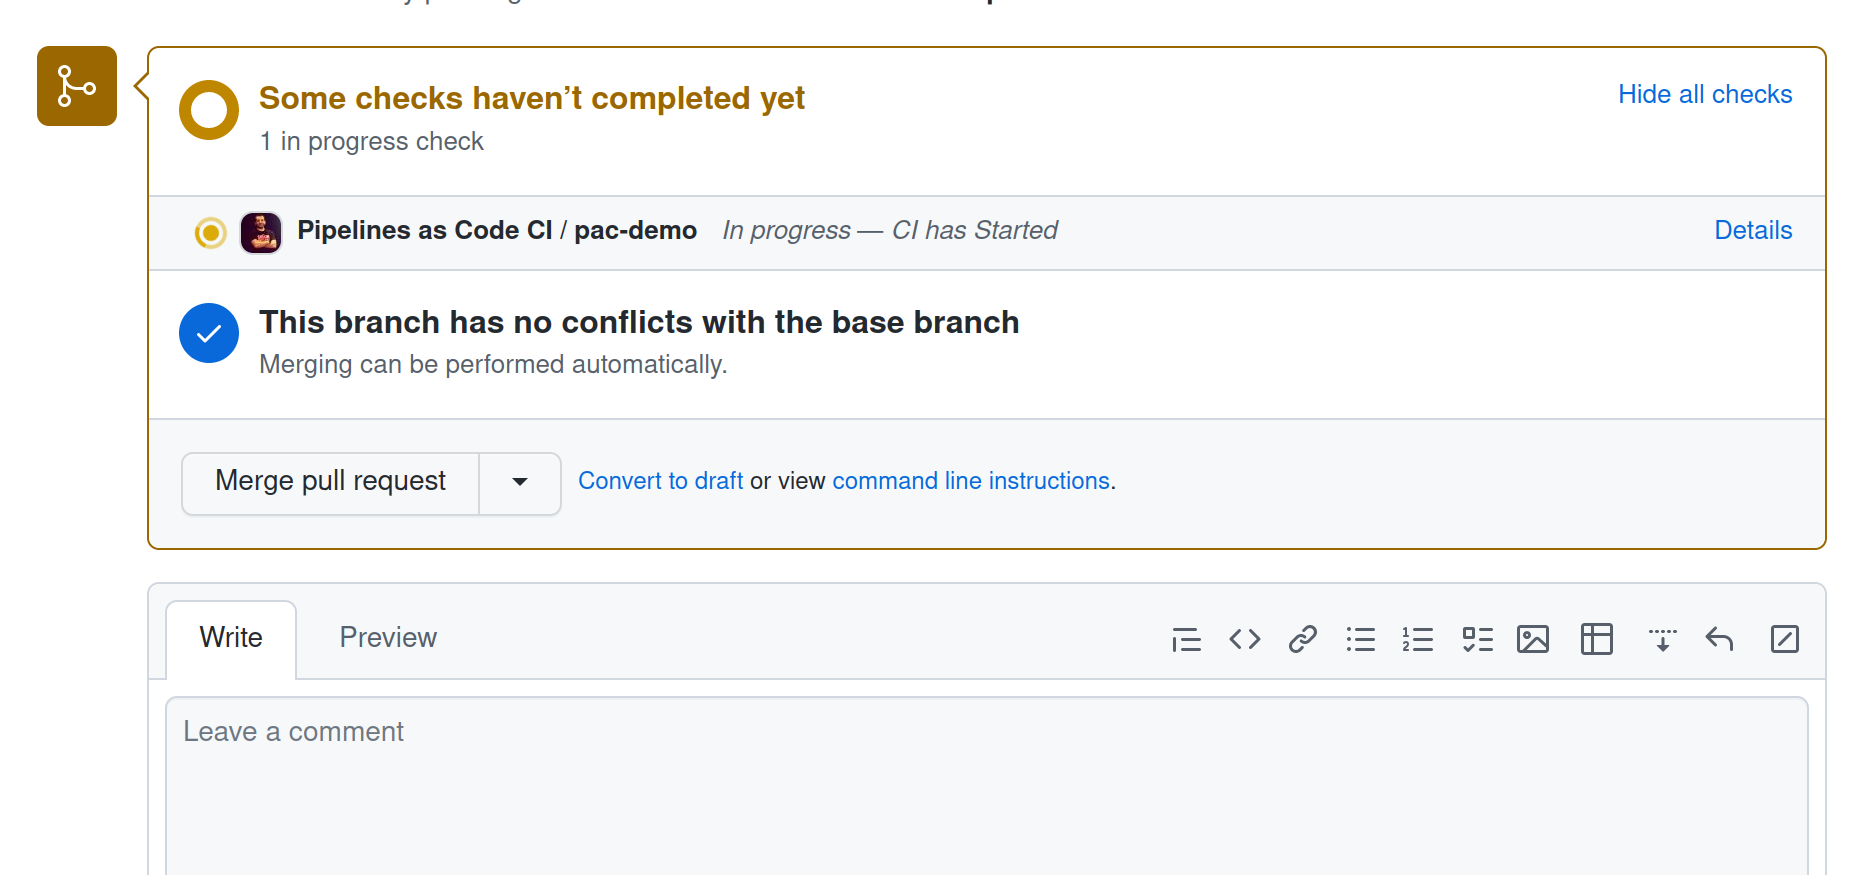
Click the “Details” link to view the PipelineRun status. Pipelines-as-Code provides links to follow the logs on the Tekton Dashboard, the OpenShift Pipelines Console, or through the Tekton CLI directly on your cluster.
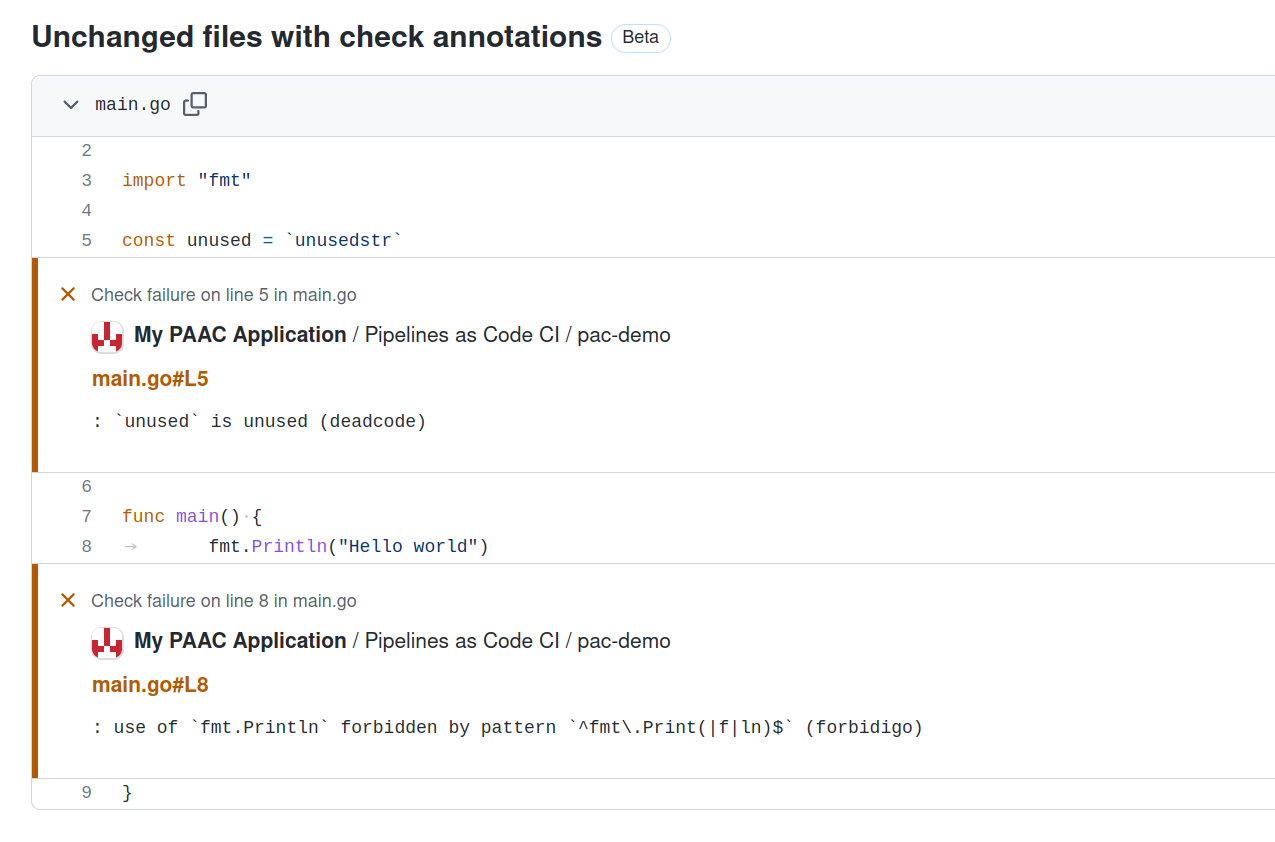
When the PipelineRun finishes, the Details screen shows an error:
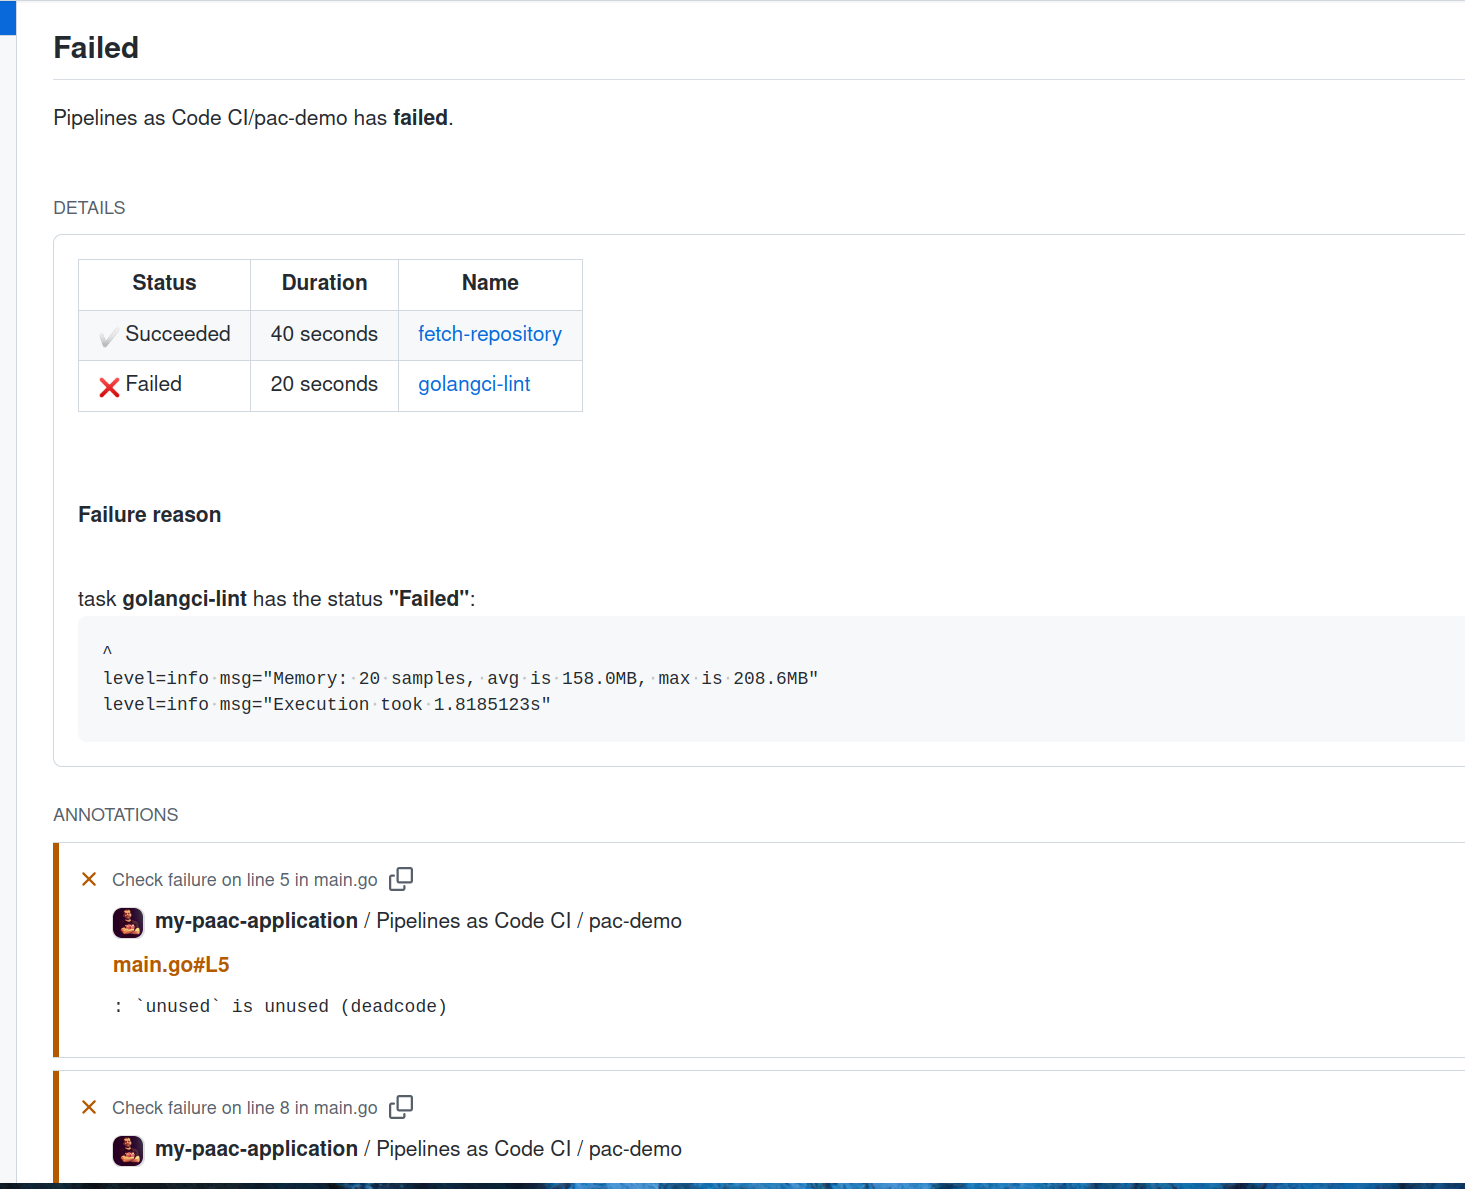
This failure is expected. The demo repository contains linting errors in the Go code that golangci-lint flags as incorrect. Notice how the error links to the specific line of code. Pipelines-as-Code analyzes PipelineRun log errors and matches them to the corresponding source lines so you can quickly identify and fix issues.
Fixing the error and pushing again
Pipelines-as-Code automatically triggers a new PipelineRun whenever you push a new commit to an open pull request. This means you can fix the error, push again, and see the result without manually re-running anything.
Return to the terminal to fix the error. Edit the file main.go, select everything, and replace it with this content:
package main

import (
    "fmt"
    "os"
)

func main() {
    fmt.Fprintf(os.Stdout, "Hello world")
}
Commit this file and push it to your branch:
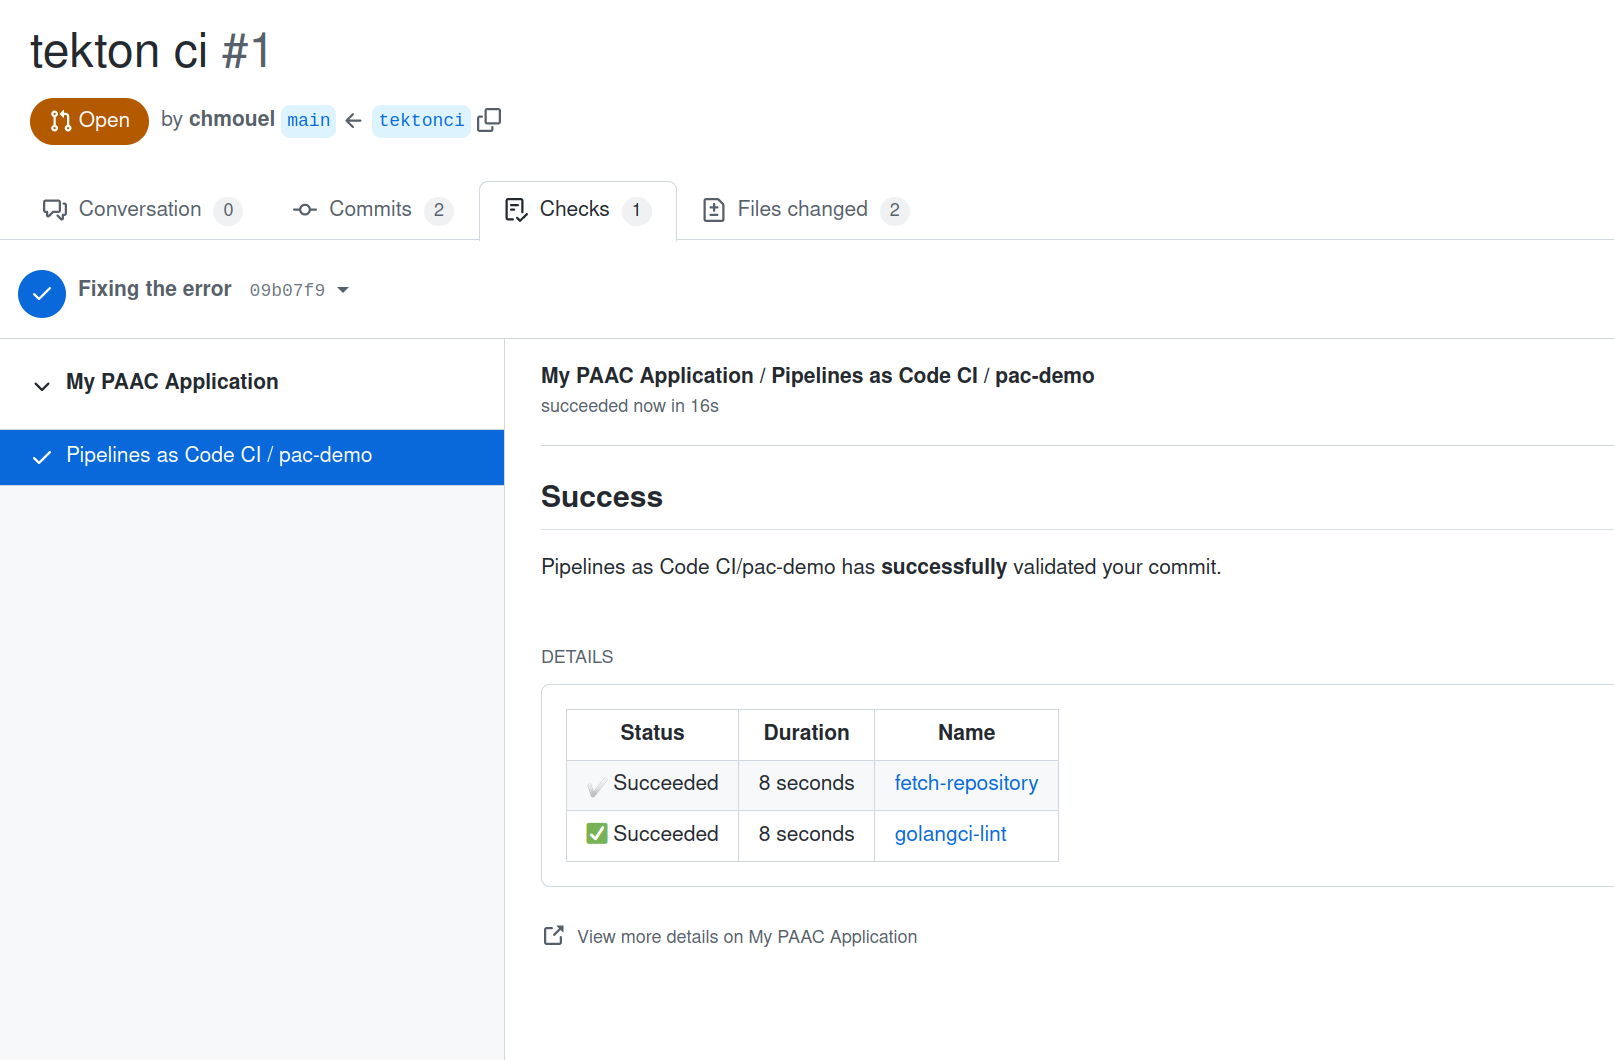
git commit -a -m "Errare humanum est, ignoscere divinum."
git push origin tektonci
Back in the browser, Pipelines-as-Code has triggered a new PipelineRun, and this time it succeeds:
Conclusion
You have successfully set up Pipelines-as-Code for running continuous integration on your repository. You can now customize the .tekton/pipelinerun.yaml file and add additional tasks as needed.
Summary
This guide covered:
- Installing Pipelines-as-Code on a Kubernetes cluster
- Creating a GitHub Application
- Creating a Repository CR
- Generating a Pipelines-as-Code PipelineRun
- Running the PipelineRun on a pull request